파이썬 프레임워크나 라이브러리에서 데코레이터는 자주 쓰이는데, 막상 일반 비즈니스 로직을 짤 때는 별로 안 쓰는 경우가 많다. 데코레이터 패턴이 어떻게 코드를 깔끔하게 만들고 유지보수하기 쉽게 해주는지 공유하고자 한다.
데코레이터 패턴 안 쓴 경우
우선 아래의 데코레이터를 사용하기 전 중복(복붙)이 많은 코드를 보라.
모든 메소드마다 로그인이 되어 있는지 체크하는 로직이 있고, 자기 본연의 비지니스 로직 외 로그인 중복을 체크하는 로직이 뒤섞여 있다. 이는 유지보수 시 굉장한 문제가 된다. 데코레이터 패턴을 사용해 깔끔한 코드를 만들어보자.
import os
from cloud_storage_client import CloudStorageClient
from exceptions import CloudStorageLoginFailedException

class CloudStorageManager:
    def __init__(self, access_key: str, secret_key: str, bucket_name: str):
        self.access_key = access_key
        self.secret_key = secret_key
        self.bucket_name = bucket_name
        self._is_logged_in = False
        self.client: CloudStorageClient | None = None

    @property
    def is_logged_in(self) -> bool:
        return self._is_logged_in

    def sign_in(self):
        if self.is_logged_in:
            return True

        try:
            self.client = CloudStorageClient(self.access_key, self.secret_key, self.bucket_name)
            self._is_logged_in = True
        except Exception as e:
            self._is_logged_in = False
            return False
        return True

    def upload_file(self, file_path: str, object_name: str = None):
        if not self.is_logged_in:
            raise CloudStorageLoginFailedException("로그인이 필요합니다.")
        if not object_name:
            object_name = os.path.basename(file_path)
        return self.client.upload_file(file_path, self.bucket_name, object_name)

    def download_file(self, object_name: str, download_path: str):
        if not self.is_logged_in:
            raise CloudStorageLoginFailedException("로그인이 필요합니다.")
        return self.client.download_file(self.bucket_name, object_name, download_path)

    def list_files(self):
        if not self.is_logged_in:
            raise CloudStorageLoginFailedException("로그인이 필요합니다.")
        return self.client.list_files(self.bucket_name)

    def delete_file(self, object_name: str):
        if not self.is_logged_in:
            raise CloudStorageLoginFailedException("로그인이 필요합니다.")
        return self.client.delete_file(self.bucket_name, object_name)
데코레이터 패턴 적용 후
require_sign_in 데코레이터를 사용함으로서 로그인 상태 확인 로직을 각 메소드에서 제거할 수 있다.
이렇게 하면 각 메소드가 본연의 기능에만 집중할 수 있어서 코드 읽기도 편해지고 관리하기도 편해진다.
import os
from functools import wraps
from cloud_storage_client import CloudStorageClient
from exceptions import CloudStorageLoginFailedException

def require_sign_in(func):
    @wraps(func)
    def wrapper(self: 'CloudStorageManager', *args, **kwargs):
        if not self.is_logged_in:
            if not self.sign_in():
                raise CloudStorageLoginFailedException("클라우드 스토리지 서비스에 로그인 할 수 없습니다.")
        return func(self, *args, **kwargs)
    return wrapper

class CloudStorageManager:
    def __init__(self, access_key: str, secret_key: str, bucket_name: str):
        self.access_key = access_key
        self.secret_key = secret_key
        self.bucket_name = bucket_name
        self._is_logged_in = False
        self.client: CloudStorageClient | None = None

    @property
    def is_logged_in(self) -> bool:
        return self._is_logged_in

    def sign_in(self):
        if self.is_logged_in:
            return True

        try:
            self.client = CloudStorageClient(self.access_key, self.secret_key, self.bucket_name)
            self._is_logged_in = True
        except Exception as e:
            self._is_logged_in = False
            return False
        return True

    @require_sign_in
    def upload_file(self, file_path: str, object_name: str = None):
        if not object_name:
            object_name = os.path.basename(file_path)
        return self.client.upload_file(file_path, self.bucket_name, object_name)

    @require_sign_in
    def download_file(self, object_name: str, download_path: str):
        return self.client.download_file(self.bucket_name, object_name, download_path)

    @require_sign_in
    def list_files(self):
        return self.client.list_files(self.bucket_name)

    @require_sign_in
    def delete_file(self, object_name: str):
        return self.client.delete_file(self.bucket_name, object_name)
'python' 카테고리의 다른 글
| 파이썬 데코레이터 활용(로깅) (1) | 2021.09.02 |
|---|---|
| python oracle 데이터 json serialize(django) (0) | 2020.02.25 |
| python super (0) | 2019.12.26 |
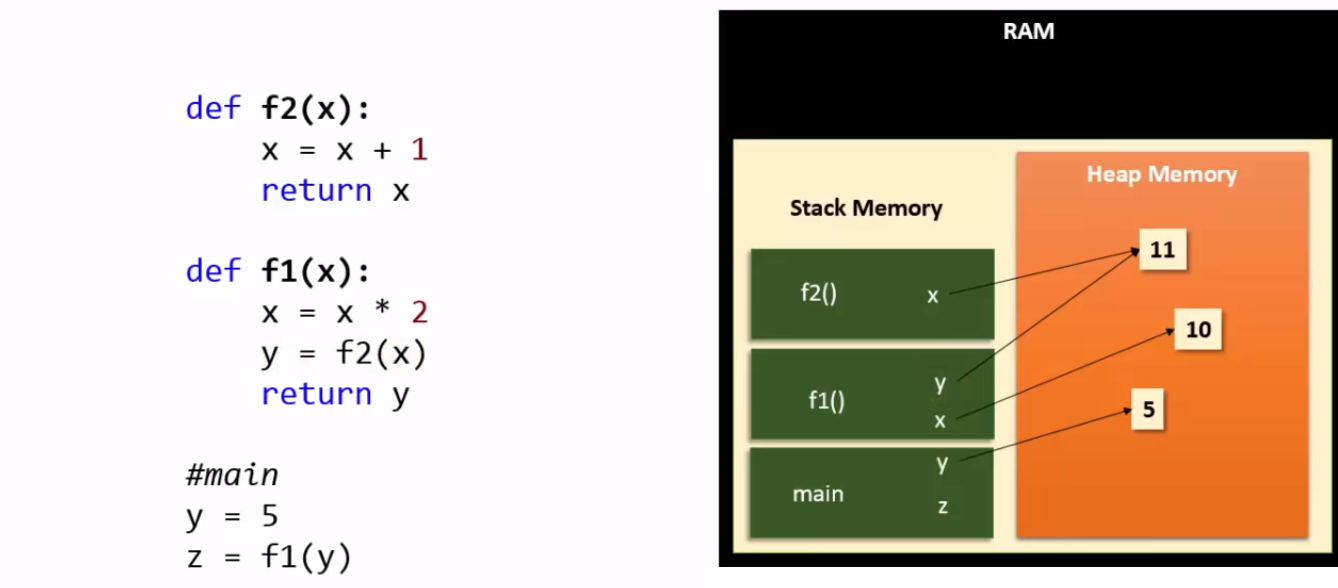
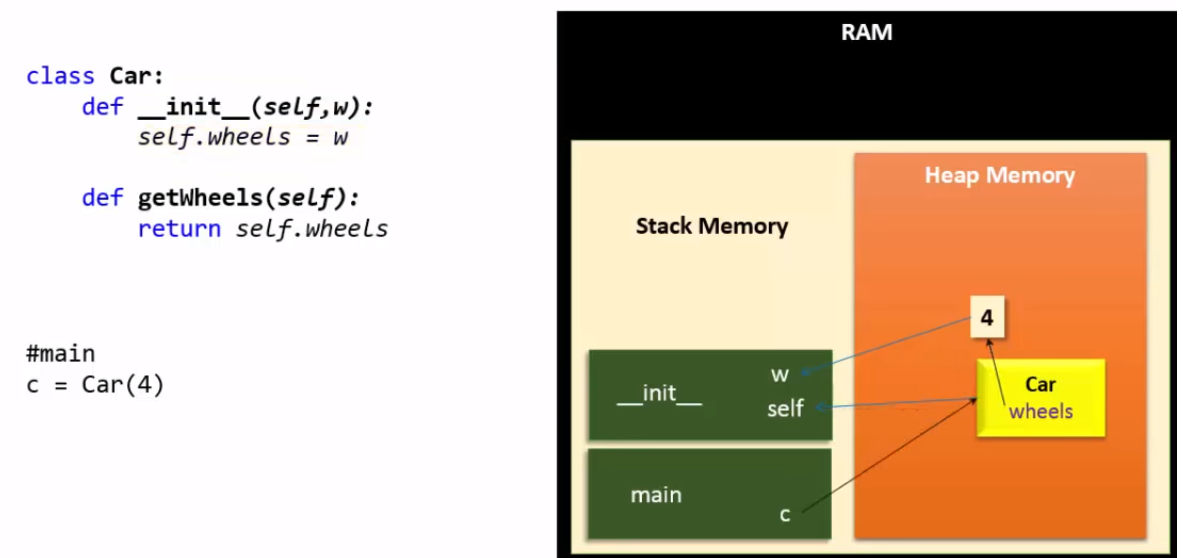
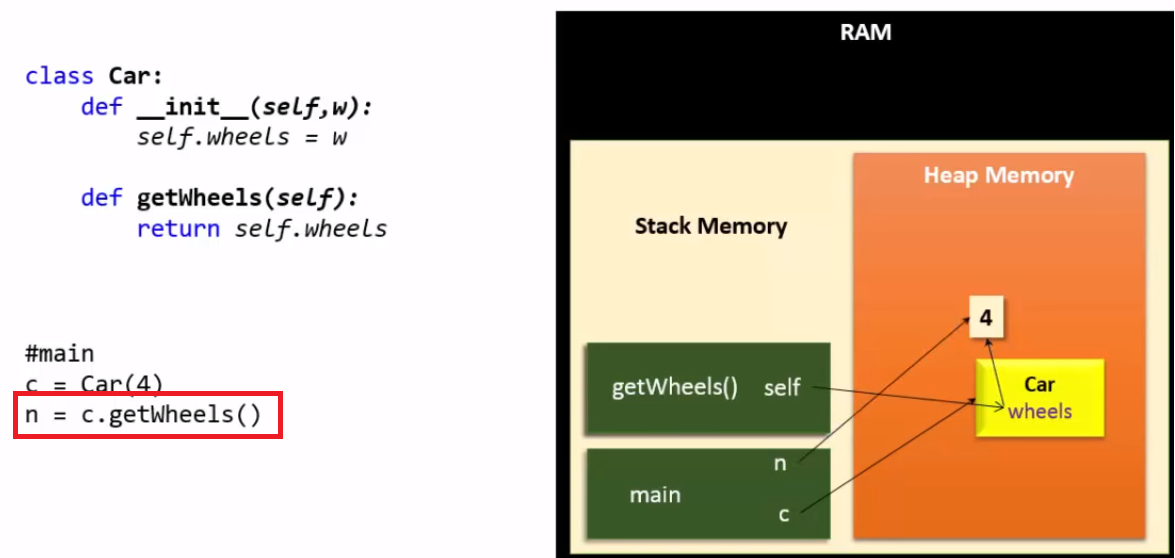
| python 메모리 관리(memory allocation) (4) | 2019.11.15 |
| 클래스 관계 IS-A 상속 (0) | 2019.11.07 |